The Build Process
In this section we will look at the build steps taken when preparing a C++ program for execution.
Table of Contents
- Running C++ Programs
- The Preprocessor
- Preprocessor Directives - Header Includes
- Preprocessor Directives - Constants and Macros
- Preprocessor Directive - Conditional Compilation
- Preprocessor Directive - Include Guards
- Inspecting the Results of Preprocessing
- The Compiler
- Inspecting the Results of the Compiler
- The Linker
- Build Tooling
- Further Reading
Running C++ Programs
Before a C++ program can be run it must first be built into an executable program. The build process converts your source code files, which are text files, into the machine instructions understood by your CPU. These instructions are then written to a binary executable format specific to your operating system.
The build process for a C++ program includes three parts that are performed in this order:
- Preprocessing
- Compilation
- Linking
The Preprocessor
The preprocessor reads through your source code files for directives, which are instructions to preprocess the contents of your source code files before compilation occurs. These directives all begin with a # and must be the first thing (other than whitespace) on a given line of source.
These directives allow you to do things like create replacement macros or to conditionally include/exclude parts of your source code from compilation.
⚡ Warning:
Directives are not statements, so they should not be terminated by semicolons.
Preprocessor Directives - Header Includes
The most common preprocessor directive is an #include statement. These statements are used to include the contents of another file in place of the #include statement. The included files might be those you have written yourself, or they can be from the C++ standard library.
For example, a source file called grinner.cpp might start with a directive like this:
#include "grinner.h" // Quotes and a trailing file extension used for relative file locations.
#include <iostream>  // Triangle braces with no file extension used for standard library includes.
When executing this directive, the preprocessor looks for a file called grinner.h in the same folder as grinner.cpp (and in other configurable locations). The #include directive is then replaced by the contents of the grinner.h file. Next, the contents of the standard library input-output stream header will be copied into the file.
You can think of #include directives like a copy-paste, from one file to another.
🎵 Note:
The preprocessor doesn’t permanently change the file when processing an include.
Preprocessor Directives - Constants and Macros
The #define directive can be used to create simple macro functions or to define constants.
Here’s an example of defining a constant called PI that can be then used to mean 3.14159:
#define PI 3.14159
// Later on in the code:
double radius = 3;
double area = PI * radius * radius;
Here’s an example of a macro function defined using this directive:
// Define a macro that will return the minimum of two given numbers:
#define MIN(a,b) (((a)<(b)) ? a : b)
// Later on in the code:
int a = 300;
int b = 200;
int smallest = MIN(a, b);
⚡ Warning:
Defining constants in this manner is no longer recommended.
Preprocessor Directive - Conditional Compilation
The #ifdef, #ifndef directives can be used in combination with #define to conditionally include/exclude portions of your code.
Here’s an example of implementing a debug-mode controlled by the presence of a #define:
#define DEBUG
// Later on in the code:
#ifdef DEBUG // If DEBUG is defined.
  cout << "In debug mode!\n";
#endif
#ifndef DEBUG // If DEBUG is *not* defined.
  cout << "Not in debug mode.\n";
#endif
Preprocessor Directive - Include Guards
You will often see #define and #ifndef directives used to ensure that a header file isn’t accidentally #include-ed multiple times.
In a header file called grinner.h:
#ifndef GRINNER_H
#define GRINNER_H // Once defined the ifndef above will no longer be true.
// The entire contents of the header file would go here.
#endif
🎵 Note:
It’s now more common to use the #pragma once instead of header include guards:
#pragma once
// The entire contents of the header file would go here.
// No need to close the #pragma statement with another directive at the end of the file.
Inspecting the Results of Preprocessing
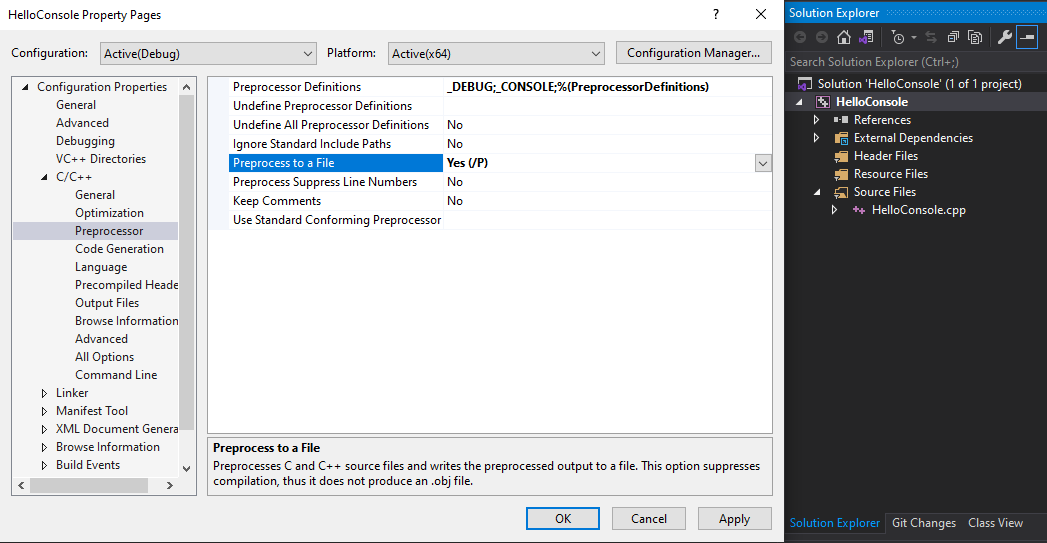
If you wish to see the results of the preprocessor, you can configure Visual Studio to output this step to a file.
Let’s do this with the Hello Console app we created in the previous module:
- Open the
HelloConsoleapp in Visual Studio. - Right-click on
HelloConsolein the Solution Explore, and selectproperties. - From there navigate to the
C/C++section and then go to thePreprocessorsection. - Change the
Preprocess to a Fileoption toYes. - Click
ApplythenOKon the properties window. - Right-click
HelloConsole.cppin the Solution Explorer and pickCompile. - Open the
HelloConsole\x64\Debug\HelloConsole.ifile to see the preprocessed cpp file. - Try adding other preprocessor directives to the
HelloConsole.cppfile and recompile to see the results.
⚡ Warning:
Set Preprocess to a File back to No. Otherwise you won’t be able to build your project.
The Compiler
Once the preprocessing step is complete, compilation can begin. It’s the compiler’s job to turn each translation unit into an object file. In most cases a translation unit is equivalent to a single .cpp file. The generated object files include the machine instructions that relate to the specific translation unit. In Windows environments these object files are given a .obj file extension, on Mac and Linux machines the file extension used is .o.
During compilation your source code will be parsed into what is called an AST, or an Abstract Syntax Tree, which is a data structure used to represent your source code as a tree-like graph of nodes and connections. It’s this AST that is then converted into machine code. It’s during this process that the compiler may report syntax errors or type errors that it finds.
Inspecting the Results of the Compiler
The object files created by the compilation process are available to you, but because they are binary files opening them won’t show you much other than binary data. If you want to see the equivalent assembly language generated by the compiler for each object file there’s another Visual Studio setting for that.
Again with the Hello Console app we created in the previous module:
- Open the
HelloConsoleapp in Visual Studio. - Right-click on
HelloConsolein the Solution Explore, and selectproperties. - From there navigate to the
C/C++section and then go to theOutput Filessection. - Change the “Assembler Output” option to
Assembly-Only Listing (/FA). - Click
ApplythenOKon the properties window. - Right-click
HelloConsole.cppin the Solution Explorer and pickCompile. - Open the
HelloConsole\x64\Debug\HelloConsole.asmfile to see the generated assembly code. - Search this file for the string
Hello Worldto see where it’s used in the assembly. - Remember to disable this setting afterwards.
The Linker
The final step in the build process is to take the various object files and link them together into a binary executable. On Windows machines the file output by the linker will have an .exe file extension. On Mac and Linux machines the linker’s output file will often be assigned a .out file extension and will be marked as an executable on the filesystem.
The most common errors generated during this step will have to do with undefined references to functions used in your source code. The linker will also complain if your source code does not include an entry point function, which is usually a function called main(). The entry point function is the function that is automatically called when you run the executable produced by the linker.
Linkers can also be used to create static or dynamic binary library files.
Build Tooling
For a simple application, say one .cpp and one .h file, you could build your executable using only a compiler. To manage the build process of more complex applications we employ build systems.
There are many different choices for C++ compilers and build systems. Different build systems can also be combined with different compilers.
The three most popular compilers in 2023 were:
- GCC - The GNU Compiler Collection
- Clang - The LLVM Compiler
- MSVC - The Microsoft Visual C++ Compiler
The three most popular build systems in 2023 were:
In this course we’ll be using MSVC with MSBuild to build our openFrameworks projects. The openFrameworks project generator automates the setup of new MSVC/MSBuild projects.