Coding with Vectors
A vector is a quantity fully described by its magnitude and its direction.
Vectors are a powerful tool for modelling physical behaviour like motion and gravity.
Table of Contents
- Objectives:
- Textbook Chapter
- Vectors, As Recap
- Vectors in p5.js
- The Trouble with Y
- Vector Addition in p5.js
- Adding to an Existing Vector
- Adding Two Vectors to Make a Third
- Vector Subtraction in p5.js
- Vector Multiplication and Division
- Vector Magnitude with p5.js
- Normalizing Vectors
- Vector Equality
- Simulating Motion with Vectors
- Extending Motion Simulation with Acceleration
- Vectors in Physics, Math, and Computer Science (10 Minute Video)
Objectives:
By the end of this module you should be able to:
- Create vector objects in p5js to store 2D values.
- Use p5js Vector objects to:
- perform 2D vector addition, subtraction, and multiplication.
- Calculate the length/magnitude of a given 2D vector.
- Calculate the normalized unit vector from a given 2D vector.
- Use vectors to model simple linear acceleration and velocity in a p5js application.
Textbook Chapter
Chapter 1 - Vectors - Nature of Code
Attribution: The textbook for this course is Daniel Shiffman’s Nature of Code, which is licensed under the Creative Commons Attribution-NonCommercial-ShareAlike 4.0 International license.
Vectors, As Recap
In an earlier module we learned that Euclidean Vectors are a mathematical entity that has both a magnitude and a director.
In this module
Vectors in p5.js
p5.js has a class called p5.Vector that we can use to represent vectors in our code. The x and y components of each vector are available as properties. Vectors are created using the createVector() function:
let vector = createVector(40, 80);
ellipse(vector.x, vector.y, 50, 50);
We can also create random vectors using p5.Vector.random2D() or create vectors from angles and lengths using p5.Vector.fromAngle(). Here’s a fun sketch that makes use of random vectors:
Edit Code Using p5.js Web Editor
Resources
- 📜
createVector()- Create new vector objects. - 📜
random2D()- Make a new 2D unit vector from a random angle. - 📜
fromAngle()- Create new 2D vector object from an angle.
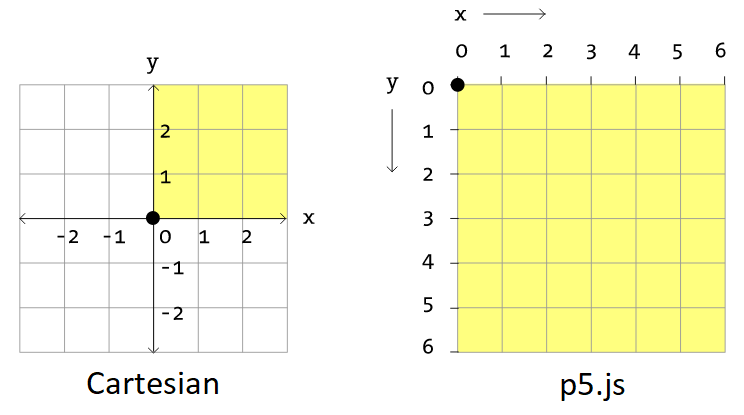
The Trouble with Y
⚡ Warning:
The positive direction of the p5.js y-axis is opposite of the Cartesian direction.
- p5.js: The y value increases as you move down the y-axis.
- Cartesian: The y value increases as you move up the y-axis.
Also, with Cartesian coordinates the origin is in the center of the canvas, but with p5.js the origin is in the top left corner.
Vector Addition in p5.js
2D vectors can be added together by summing their x and y components to make a new vector.
Manually this could be done as follows:
// c = a + b
let a = createVector(40, 80);
let b = createVector(5, 10);
let c = createVector(a.x + b.x, a.y + b.y);
Adding to an Existing Vector
Vector addition can be performed in p5.js by mutating an existing vector with the .add() method, or by creating a new vector using the static method p5.Vector.add().
Here’s an example of adding to an existing vector:
let position;
let velocity;

function setup() {
  createCanvas(320, 150);
  position = createVector(0, 0);
  velocity = createVector(2.5, 5);
}

function draw() {
  background(235);

  // Add the velocity vector to the position:
  position.add(velocity);

  if (position.x > width || position.x < 0) {
    velocity.x = velocity.x * -1;
  }
  if (position.y > height || position.y < 0) {
    velocity.y = velocity.y * -1;
  }

  ellipse(position.x, position.y, 25, 25);
}
Resources
- 📜
.add()- Vector addition methods.
Adding Two Vectors to Make a Third
Another way to think about vector addition is to place two vectors “tip to tail”. The final position of this “journey” along the two vectors is their sum.
Here’s a sketch demonstrating this idea that uses the static p5.Vector.add() method to add two vectors:
function draw() {
  background(240);

  let origin = createVector(0, 0);
  let a = createVector(mouseX, mouseY);
  let b = createVector(-50, 40);

  // Create a new vector by adding a and b:
  let c = p5.Vector.add(a, b);

  drawArrow(origin, a, colorA);
  drawArrow(a, b, colorB);
  drawArrow(origin, c, colorC);

  drawText();
}
Not shown are the setup(), drawText(), and drawArrow() methods. See the full code here.
Resources
- 📜
p5.Vector.add()- Vector addition methods.
Vector Subtraction in p5.js
2D vectors can be subtracted by manually subtracting their x and y components.
Like addition, we can more easily perform vector subtraction by mutating an existing vector with the .sub() method, or by creating a new vector using the static method p5.Vector.sub().
Resources
- 📜
.sub() & p5.Vector.sub()- Vector addition methods.
Vector Multiplication and Division
Vectors can be scaled in length by multiplying or dividing them by scalar values. A vector’s direction in unaffected by these operations.
In p5.js like with addition/subtraction, multiplication/division of vectors can be done by mutating an existing vector using .mult() and .div(), or by creating new vectors using the static p5.Vector.mult() and p5.Vector.div() methods.
Here the blue vector is a scaled copy of the red one. The scale is controlled by the mouse’s x position:
let center = createVector(width / 2, height / 2);
let redVector = createVector(width / 5, -width / 5);
let scaleFactor = map(mouseX, 0, width, -2, 2, true);
let blueVector = p5.Vector.mult(redVector, scaleFactor);
Edit Full Code Using p5.js Web Editor
Resources
- 📜
.mult() & p5.Vector.mult()- Vector multiplication methods. - 📜
.div() & p5.Vector.div()- Vector division methods.
Vector Magnitude with p5.js
In our vector math module we saw that a vector’s magnitude can be calculated using the Pythagorean theorem.
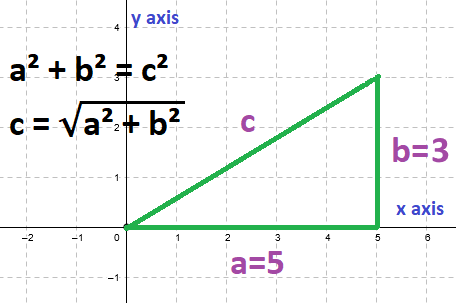
c² =  a² + b²
c  =  √(a² + b²)
c  =  √(5² + 3²)
c  =  √(25 + 9)
c  =  √34
c  ≅  5.83095189
With p5.js we can skip the high school math and use .mag() or p5.Vector.mag():
let origin = createVector(0, 0);
let vector = createVector(mouseX, mouseY);
let length = vector.mag().toFixed(2);
Edit Full Code Using p5.js Web Editor
⚡ Warning:
Calculating magnitude is expensive due to the square root.
You can get away with using the computationally cheaper .magSq() if don’t care about the actual value and only want to compare vectors. You can also get an approximation magnitude, using this “dog-leg” approximation:
function magnitude(a, b) {
  a = Math.abs(a);
  b = Math.abs(b);
  var lo = Math.min(a, b);
  var hi = Math.max(a, b);
  return hi + (lo + Math.max(0, lo + lo + lo - hi)) / 8;
}
Resources
- 📜
.mag() & p5.Vector.mag()- Vector multiplication methods. - 📜
.magSq() & p5.Vector.magSq()- Vector multiplication methods.
Normalizing Vectors
A unit vector is a vector with a magnitude of exactly 1. Normalization is the process of converting a vector to a unit vector by dividing it by its magnitude.
In the following sketch we normalize a copy of the red vector and then multiply it by the circle radius to get the blue vector. The same thing could have been accomplished by setting the blue vector length to the circle radius using .setMag():
let radius = 50;
let origin = createVector(width / 2, height / 2);
let vectorRed = createVector(mouseX, mouseY).sub(origin);
let vectorBlue = p5.Vector.normalize(vectorRed).mult(radius);

// Alternatively we could create the blue vector like this:
// let vectorBlue = vectorRed.copy().setMag(radius);
Edit Full Code Using p5.js Web Editor
Vector Equality
To check if two vectors are equal we have to use the .equals() method, rather than the == or === operator:
let v1 = createVector(5, 10);
let v2 = createVector(5, 10);

// == and === will not work:
console.log(v1 == v2); // false
console.log(v1 === v2); // false

// .equals() is how we check equality:
console.log(v1.equals(v2)); // true
console.log(v1.equals(5, 10)); // true
Simulating Motion with Vectors
Near the beginning of this module we saw a sketch that simulating a bouncing ball. Two vectors were used, one to represent the position of the ball, and another to represent its velocity.
This is the basis for simulated physical motion:
- Add velocity to position.
- Update position or velocity if necessary. (Example: Wall bounce or canvas wrap)
- Draw object at position.
- Repeat.
In the case of the bouncing ball the code looked like this:
// 1. Add velocity to position.
position.add(velocity);

// 2. Update the velocity if necessary.
if (position.x > width || position.x < 0) {
  velocity.x = velocity.x * -1;
}
if (position.y > height || position.y < 0) {
  velocity.y = velocity.y * -1;
}

// 3. Draw object at position.
ellipse(position.x, position.y, 25, 25);

// 4. Repeat (The above code goes inside the draw() function.)
Click here to see the bouncing ball example refactored as a class.
Extending Motion Simulation with Acceleration
If velocity is the rate of change of position, then acceleration is the rate of change of velocity.
With acceleration added our steps for simulation physical motion become:
- Calculate current acceleration.
- Add acceleration to velocity.
- Limit velocity to a maximum speed. (Example: Vehicle’s max speed)
- Add velocity to position.
- Update position or velocity. (Example: Wall bounce or canvas wrap)
- Draw object at position.
- Repeat.
Acceleration can be calculated in all sorts of ways. For example:
- Acceleration towards a goal.
- Random or noise-based acceleration. (The return of the random walker!)
- Acceleration due to gravity. (local scale: 9.8m/s down)
- Acceleration due to gravity. (solar system scale: sum of attractive celestial bodies)
Here’s a sketch of the first type, where our “mover” accelerates towards the mouse pointer:
function draw() {
  background(250);
  mover.update(); // Update position from velocity.
  mover.checkEdges(); // Edge bounce.
  mover.display(); // Display as ball. Click canvas for "nose".
}

class Mover {
  constructor(startingPosition, startingVelocity, speedLimit, size) {
    this.position = startingPosition;
    this.velocity = startingVelocity;
    this.speedLimit = speedLimit;
    this.size = size;
  }

  // Add the mover's velocity to its position.
  update() {
    // Calculate the distance (delta) to the mouse.
    let mouse = createVector(mouseX, mouseY);
    let delta = p5.Vector.sub(mouse, this.position);

    // Scale the directional delta to a magnitude from 0 to 0.5.
    delta.normalize().mult(0.5);
    this.acceleration = delta;

    // Acceleration changes the mover's velocity.
    this.velocity.add(this.acceleration);

    // Mover has a maximum speed.
    this.velocity.limit(this.speedLimit);

    // Velocity changes the mover's position.
    this.position.add(this.velocity);
  }

  // Display the mover as circle at its current position.
  // Hit any key to see a "nose" visualizing the current velocity.
  display() {
    // See full source code linked below.
  }

  // Implements an "edge bounce".
  checkEdges() {
    // See full source code linked below
  }
}
Edit Full Code Using p5.js Web Editor
☝️ Ball will accelerate towards mouse pointer. Click to increase number of movers from 1 to 10.